Prerequisites
- Products: Liquid UI WS, Liquid UI Server or Local DLL, Client Software
- Commands: copytext(), set(), pushbutton()
Purpose
In this article, you will learn how to change the material name and description of the existing material directly on the MM02 screen using a pushbutton. And, retrieve and edit the details of the input field and save them on the same screen. To demonstrate this, we'll guide you through the following steps.
- Add a pushbutton to run the process on click
- Add a condition to edit the required Material details.
- Add a function to update text
- Add a function to read text
- Add a function to close text
- Create a scenario to edit material details
User Interface
//Create this file inside your script folder for customizing the Change Material: Initial screen. SAPLMMGMM.E0060.sjs
//Now, let's start adding the Liquid UI script to the above file and save it.
Customization
- Add a pushbutton "Change material name and description" to read the text on click.
//creates a push button "Change material name and description".
pushbutton([10,5],'Change material name and description',{"process":MM02_ReadText,"size":2});
-
Customize the screen by adding conditional statements to execute the steps and edit the required Material details.
// Creates a condition to execute the steps when navigated to the MM02
transaction if(_transaction=='MM02')
{ //old if Q[Transaction=MM02] if(MM02_DisplayTextbox=='X')
{ if (MM02_DisplayTextbox=N) box([8,0],[25,82],""); inputfield([9,2],"Material &V[MM02_Material]",[9,33],{"name":"MM02_Materialtext","size":40}); textbox([10,1],[22,80],{"name":"MM02_text"}); pushbutton([24,2],"@2L@Save",{"process":MM02_UpdateText}); pushbutton([24,20],"@42@Refresh text",{"process":MM02_ReadText}); pushbutton([9,78],"@02@",{"process":MM02_CloseText}); } else
{ pushbutton([10,5],'Change material name and description',{"process":MM02_ReadText,"size":2}); } } - Now, add a function to retrieve the material details and display them in the fields created on the same screen.
//add function ReadText() function MM02_ReadText()
{ set("V[MM02_Material]",'&F[Material]'); onscreen 'SAPLMGMM.0070' set('cell[Table,0,1]','X'); enter(); onscreen 'SAPLMGMM.4004' enter('=PB26'); onscreen 'SAPLMGMM.4300' set("V[MM02_Materialtext]", '&F[MAKT-MAKTX]'); copytext({"fromscreen":"X[LONGTEXT_GRUNDD]","totext":"MM02_text"}); set("V[MM02_DisplayTextbox]",'X'); enter('/NMM02'); } - Add a function to update/save the edited Material details.
//add function UpdateText()
function MM02_UpdateText(){
  set("F[Material]",'&V[MM02_Material]');
  enter();
onscreen 'SAPLMGMM.0070'
  set('cell[Table,0,1]','X');
  enter();
onscreen 'SAPLMGMM.4004'
  enter('=PB26');
onscreen 'SAPLMGMM.4300'
  set("F[MAKT-MAKTX]",'&V[MM02_Materialtext]');
  copytext({"toscreen":"X[LONGTEXT_GRUNDD]","fromtext":"MM02_text"});
  enter('/11');
}
- Add a function to clear all the field values fetched for the Material.
//add function CloseText()
function MM02_CloseText()
{
set("V[MM02_DisplayTextbox]",'N');
enter('/NMM02');
}
SAP Process
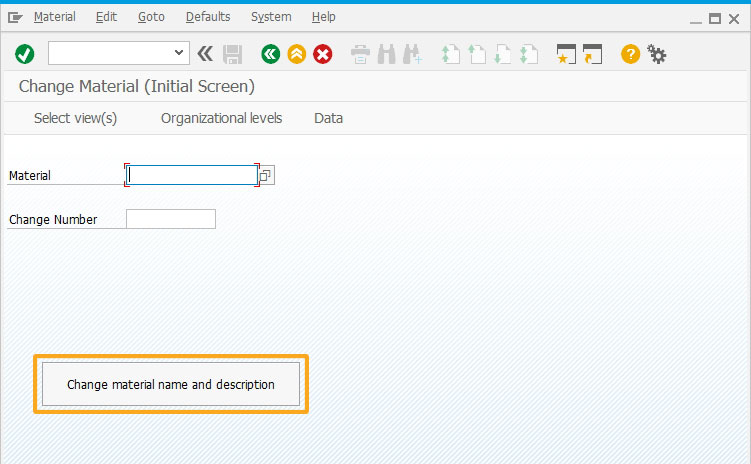
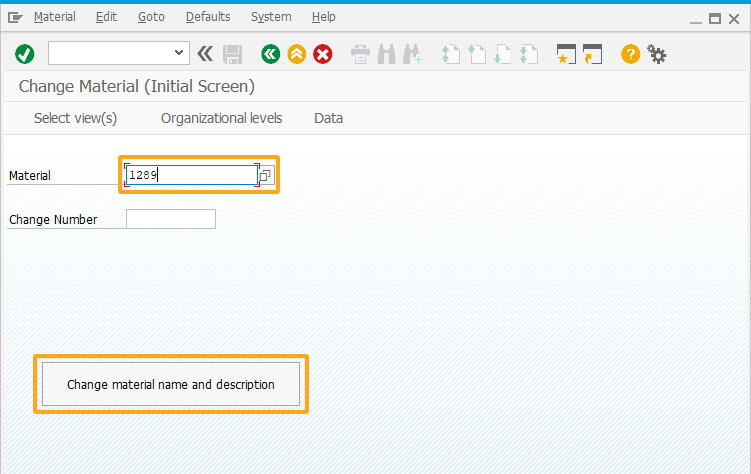
- Navigate to MM02 transaction, enter the Material number in the Material input field. Now, click the Change material name and description push button, as shown in the image below.
- Now, you can see material name and description are retrieved on the screen for the Material number entered, as shown in the image below.
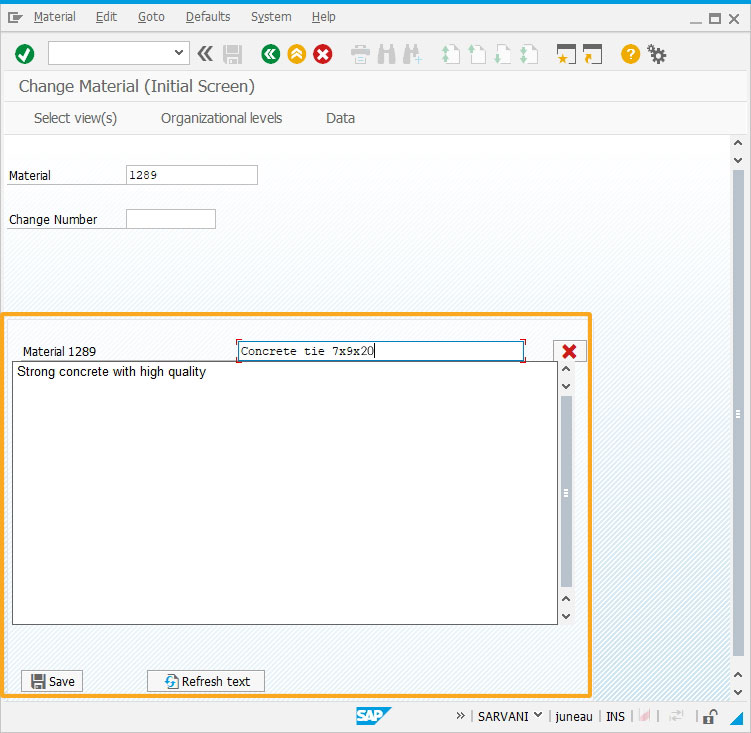
- Edit the values as per the requirement and click the save button. Then, you can see the updated Material name and description, as shown in the image below.

Next Steps
Assign values to screen elements
Learn how to assign values to various screen elements based on condition.
Learn how to assign values to various screen elements based on condition.
5 min
This article is part of the Conditional scripts tutorial.


