Show Posts

This section allows you to view all posts made by this member. Note that you can only see posts made in areas you currently have access to.


Messages - Rahul Gera

Pages: [1] 2 3 ... 6
1
Purpose: Creating Server certificate and Private Key using OPENSSL for Liquid UI.

Certificate can be generated with the online openssl.exe tool, with the following commands:

>>openssl req -x509 -nodes -days 365 -newkey rsa:2048 -keyout private.key -out server.crt

Note: -days means the valid days for this certificate.

You are about to be asked to enter information that will be incorporated into your certificate request.
What you are about to enter is what is called a Distinguished Name or a DN.
There are quite a few fields but you can leave some blank
For some fields there will be a default value,
If you enter '.', the field will be left blank.

Country Name (2 letter code) [AU]:US
State or Province Name (full name) [Some-State]:CA
Locality Name (eg, city) []:
Organization Name (eg, company) [Internet Widgits Pty Ltd]:Liquid UI WebServer
Organizational Unit Name (eg, section) []:LUS
Common Name (e.g. server FQDN or YOUR name) []:
Email Address []:

Server CRT and Private KEY are generated !!

2
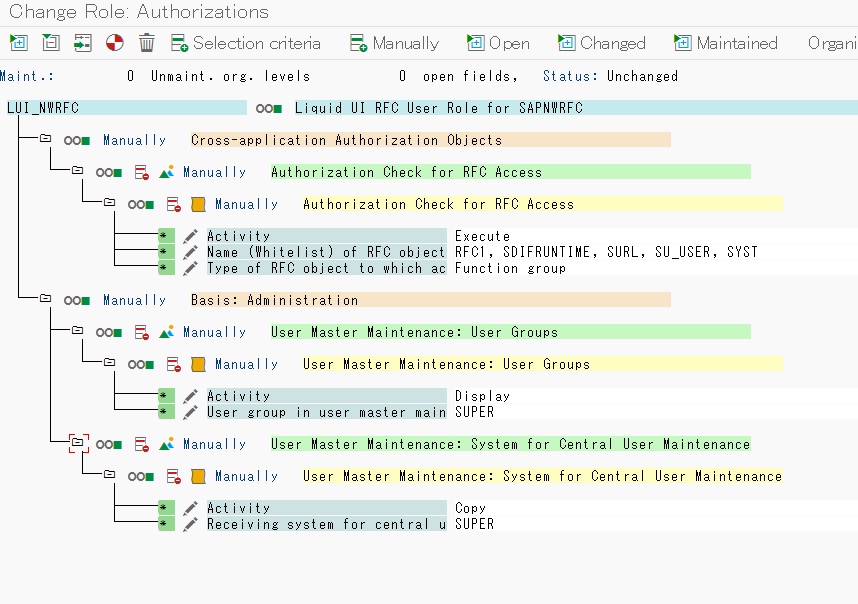
Purpose: TO CREATE REQUIRED RFC AUTHORIZATIONS for RFC user in Liquid UI using SAPNWRFC

Creating and Maintaining RFC USER
   Transaction - SU02
   Click 'To Profile Generator'
   Create Role - Click on "Role" button
   Tab to "Authorization" -This will give you a pop up screen as shown above
   Click "yes" on popup to "save"
   Click "Change Authorization Data"
   Click "Do not select templates"
   Click "manually"
   Type RFC1, SDIFRUNTIME, SURL, SU_USER, SYST
   Click on "Open"
   Clicking on the open button gives you a screen as follows:
   After you click on "open"
   Click on the "write" or "change" icon shown on screen shot
   Select "Execute" on the pop up screen and then click on "save" button
   Similarly, the parameters for "name of RFC to be protected" and "Type of RFC to protect" could be set.
   Using Existing Remote Enabled SAP Function Modules, specify the function group for those function modules (Name of RFC to be protected)
   Alternatively, add the appropriate role to the RFC User
   Set parameters as shown in following screen shot
   Click "Generate"
   Click on "Save"
   Click "Back"
   This is a system generated Profile name; we can edit this information and text.
   Click "Generate" again

3
Developer Toolkit (Designer and Workbench) / Reasons for HOST ID change
« on: August 20, 2019, 01:12:30 PM »
Purpose: To understand, the change of HOST ID based on the circumstance.

Liquid UI software are license products, and the License is dependent on Host ID, which is a unique identifier, differing from machine to machine.
This HOST ID is generated by Synserialmanager, which is the License Manager for Liquid UI Products.

These are few of the reasons why the Host ID changes, please see below:

1. OS version
2. ROM date
3. System BIOS date (date registry)
4. Hard disk serial number

Note: You'll need a new license key once the HOST ID changes.

If a machine is upgraded, there might be a change from the above that caused a change in HOST ID.
Notice: Running it on a Virtual Machine, the HOST ID usually changes as well.

4
Purpose: Liquid UI Enterprise Portal License installation on Handheld device.

Note: Handheld device primarily do not have a camera option on the device hardware, so Liquid UI Enterprise Portal License cannot be scanned.
          User(s) will not have corporate email access on handheld device, so Liquid UI Enterprise Portal License cannot be scanned.

** If the handheld device has a camera, navigate to Liquid UI Enterprise Portal License Installation, to install the License on Liquid UI Client on handheld device.
** If the user(s) has access to corporate email, on the handheld device, navigate to Installation of Liquid UI Management Portal License, to install the license on Liquid UI Client on handheld device.

Continue with this documentation,
If the handheld device, do not have Camera to scan the QR Code.
If the user(s) do not have Corporate email access, on handheld device.

This method involves Barcode Reader provided on the Handheld device, to scan a generated QR code, to apply the Enterprise Portal License to the Liquid UI Client App.

Steps to generate a QR code on Windows PC, using the License email that gets generated when a user is added in LMP.
Step 01: Navigate to email that was received from Liquid UI License Management Portal (LMP).
Step 02: In "To activate your device" section, Right Click on any of the "Click here" hyperlink.
Step 03: Select "Copy Hyperlink", from the pop up menu, after the right click.
Step 04: Open Notepad++ (or any notepad editor), and paste the copied hyperlink.
Step 05: From the pasted, hyperlink, remove "https://ps.liquid-ui.com/rest.php?data=".
Step 06: Look for (use Ctrl + F, Find option)
               * %2B
               * %2F
               * %3D

Step 07: Replace
               * %2B with +
               * %2F with /
               * %3D with =

Step 08: Select all, and copy the newly replaced and modified key.
Step 09: Navigate to Free Online ScanCode generator website.
Step 10: In the website, under QR Code (Mobile/Smartphones), in the Data Textbox, remove all the sample data.
Step 11: Paste the newly modified key from Step 08 and Click "Refresh".
Step 12: On the Right side, a new QR Code is generated.

Steps to follow on the Device, to install Liquid UI License:
Step 01: Launch the Liquid UI App
Step 02: Tap on the Menu icon (three horizontal lines) inTop Left corner.
Step 03: Select "Request License" from the menu.
Step 04: Select "Portal License Manager" from the buttons.
Step 05: From the input entry field, Remove/Delete "Please enter license code". (After removal/deletion, there will still be "Please enter license code", but in background)
Step 06: Now use handheld scanner, to scan the new QR Code, that was generated in Step 12, of the previous process.
Step 07: Tap "Submit" button on the screen (If the Handheld is not configured to perform an "Auto Enter", after each scan).

License is successfully scanned, using Handheld scangun.

5
Purpose: To install Liquid UI WebServer as a Windows Service.

Pre-Requisites:
1. Liquid UI WebServer to be installed on Server Machine.
2. Administrative Privileges to install Services.

Steps to install Liquid UI WebServer as a Service:
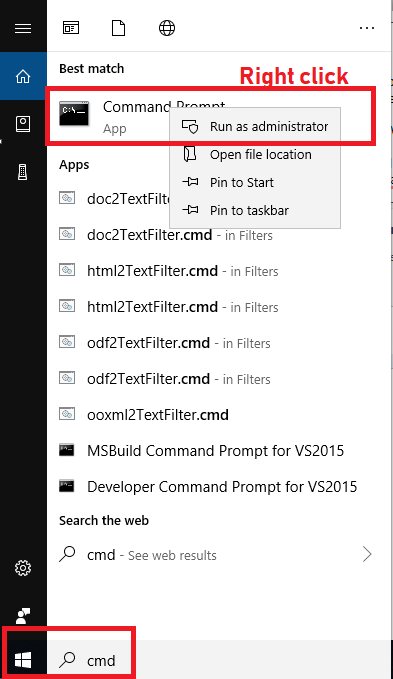
Step 01: Open Command Prompt as an administrator.
              - Type cmd in the search bar, and when selecting, right click and select "Run as administrator".
               
Step 02: Navigate to Liquid UI WebServer installed folder in Command Prompt.
              - cd C:\Program Files\Liquid UI\LUI WebServer
Step 03: Type "GuiXT4WebApp.exe -install WebServer.js" and hit "Enter"
Step 04: A success message "GuiXT Fuzion Service installed" will be displayed on command prompt screen.
               

Verification:
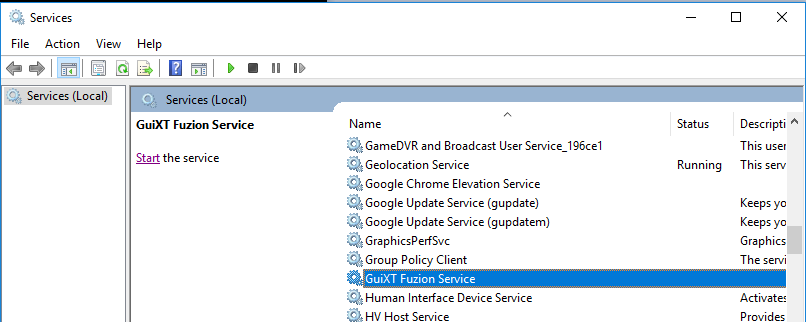
Type Services.msc in the search bar, and select Services Application.
In the Services Window find "GuiXT Fuzion Service".


6
Purpose: Download and installation of Liquid UI WebServer on a Physical or a Virtual Machine.

Highly Recommended: Installation of latest or available SAPgui

Software download links, for the latest version of Liquid UI WebServer
32 Bit O.S  -->  Download
64 Bit O.S  -->  Download

Note: Installation of the above Setup file(s), needs to be performed by an ADMIN on the machine, and as an Administrator (Right Click on the .exe, and choose "Run as administrator").

Default Liquid UI WebServer installation location, on a Windows Machine
32 Bit O.S --> C:\Program Files\Liquid UI\LUI WebServer
64 Bit O.S --> 32 Bit Liquid UI WebServer Software --> C:\Program Files (x86)\Liquid UI\LUI WebServer
64 Bit O.S --> 64 Bit Liquid UI WebServer Software --> C:\Program Files\Liquid UI\LUI WebServer

Below step is needed only, if Liquid UI WebServer is Migrated from one machine hardware to New Hardware
Please copy and paste, the below from the Backup
   1. Config.js
   2. GuiXT.sjs


License is required to Execute Liquid UI WebServer software.
Request Liquid UI WebServer license from Synactive.
Installation of Liquid UI WebServer License.


7
Purpose: To allow SAPHTTP functionality when accessing through Liquid UI Server
(e.g. using transaction CV04N to open a document).
(e.g. using ScreenPainter.exe to modify a screen layout in SE80).

When accessing SAPHTTP functionality, the below RFC will be performed.
------------------------------------------------------------------------------------------------------------------------------------
CALLING Function "RFC_REMOTE_EXEC"
Parameter "COMMAND". Length=256(0x100) Value="gnetx.exe SAPServer sapgw00 93701840 IDX=2"
Parameter "RFCSERVER". Length=1(0x1) Value="Y"
Parameter "USEGWHOST". Length=1(0x1) Value="N"
------------------------------------------------------------------------------------------------------------------------------------

------------------------------------------------------------------------------------------------------------------------------
TO EXECUTE the RFC Call, which OPENS a new CONNECTION to SAP Server via sapgw00(port 3300),
------------------------------------------------------------------------------------------------------------------------------
Configure a corresponding RFC proxy in SAPPROXY.ini
[Proxy5]
ListenPort = 3300
TargetServer = SAPServer
TargetServerPort = 3300
GuiXT = 10


Note: If both DEV/QA are on same Liquid UI Server, with the same RFC ports, then there will still be an issue, as only the first ListenPort with bind.

Example:

8
Purpose: Usage of latest RFC Libraries for Liquid UI software.

Liquid UI for Desktop: 1.2.342.0 and above
Liquid UI for Server: 3.5.589.0 and above

Liquid UI supports the latest RFC Libraries that are being deployed by SAP since SAPgui 750.
The latest RFC Libraries that SAP deployed is called SAPNWRFC, and the file that is used is SAPNWRFC.DLL

Based on the machine that SAPgui is installed, SAPNWRFC.DLL is installed,
32 Bit O.S. --> C:\Windows\System32
64 Bit O.S --> C:\Windows\SysWOW64

Note: SAPgui is a 32Bit software, the SAPNWRFC is a 32bit application.

Identification:
Way to identify the RFC Libraries being used with Liquid UI, when SAPgui is executed.

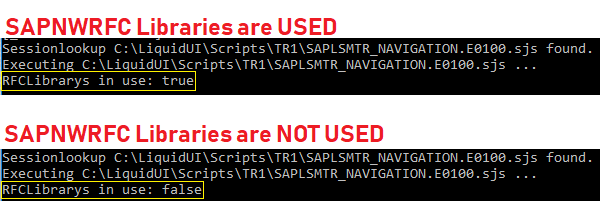
_nwrfcinuse is a Liquid UI System variable, and the result is either "TRUE" or "FALSE".
This system variable becomes
"TRUE" when SAPNWRFC is used for RFC Communication.
"FALSE" when LibRFC is used for RFC Communication.

example script:
Place the below code in screen script or fuction script
println("RFCLibrarys in use: "+_nwrfcinuse);

Cornelius window Output:


9
Purpose: To use enter({fromScreenLongtext:true}); command for CopyText.
1. To use CopyText command to Copy Text from SAP TextBox to Liquid UI Text Area.
2. To use CopyText command to Copy Text from Liquid UI Text Area to SAP Text Box.
3. To use CopyText command to Copy Text from Liquid UI Text Area to SAP Text Box, appending the data in the SAP Text Box.

Sample working Scripts:

IW32 screens:
/* *************************************
************** Screen Script **************
 ******** SAP EASY ACCESS SCREEN ***********
 ***** SAPLSMTR_NAVIGATION.E0100.sjs *******
**************************************
************************************** */


clearscreen();
// 1.
pushbutton([1,1],"Copytext 'fromscreen' to below textbox",'/nIW32',{'size':[2,50],'process':procCopyText, 'using':{'ptype':'FROM'}});
textbox([4,1],[12,75],{"name":'mytext2', 'readonly':true});
// 2.
pushbutton([15,1],"Copytext 'toscreen' from below textbox [Enter Data below]",'/nIW32',{'size':[2,50],'process':procCopyText, 'using':{'ptype':'TO'}});
// 3.
pushbutton([15,62],"Copytext 'toscreen' from below textbox [Enter Data below] using appendline",'/nIW32',{'size':[2,70],'process':procCopyText, 'using':{'ptype':'TOAPPEND'}});
//10006673
textbox([18,1],[26,75],{"name":'mytext1'});
pushbutton([28,1],"Clear both Textboxes",'?',{'size':[2,50],'process':procClearTextboxes});

/* *************************************
**************************************
 ************** Function Scripts *************
*****************************************
************************************** */

function procCopyText(param){
   onscreen 'SAPLCOIH.0101'
      set('F[Order]','822409');         //ZEUS data
      if(param.ptype == 'FROM' || param.ptype == 'TOAPPEND'){
         enter({fromScreenLongtext:true});                 // SINCE IT CAN JUMP directly because of TEXT_CONTINUE, to be safe.
                                                                                                              // Screen prior to copytext({'fromscreen':'X[LTEXT]','totext':'mytext2'});

      }
      else {
         enter();
      }      
      
   onscreen 'SAPLCOIH.3000'
      if(!<'X[LTEXT]'>.isValid){
         if(param.ptype == 'FROM' || param.ptype == 'TOAPPEND'){
            enter('=LTHE', {fromScreenLongtext:true}); // Screen prior to copytext({'fromscreen':'X[LTEXT]','totext':'mytext2'});
         }
         else {
            enter('=LTHE');
         }         
      } else {
         goto TEXT_CONTINUE;
      }
   
   onscreen 'SAPLCOIH.3000'
      TEXT_CONTINUE:;
      if(param.ptype == 'TO'){
         copytext({'fromtext':'mytext1','toscreen':'X[LTEXT]'});
         enter();
      } else if(param.ptype == 'TOAPPEND'){
         copytext({'fromtext':'mytext1','toscreen':'X[LTEXT]',"appendline":true});      //Should start appending from new line
         enter();
      } else if(param.ptype == 'FROM'){
         copytext({'fromscreen':'X[LTEXT]','totext':'mytext2'});
         enter('/n');
      }
      
   onscreen 'SAPLCOIH.3000'
      enter();
}

function procClearTextboxes(){
   var z_blank = "";
   copytext({'fromstring':'z_blank','totext':'mytext1'});
   copytext({'fromstring':'z_blank','totext':'mytext2'});
}


10
Purpose: Syntax of RFCConnect statement used in GuiXT.sjs file.

Syntax:
Application Server:
rfcconnect = ["IFDATABASE=DEV, CLIENT=120, ASHOST=APPServer, SYSNR=00"];

Message Server(Load Balancing Server):
rfcconnect = ["IFDATABASE=DEV, R3NAME=DEV, CLIENT=120, MSHOST=MSGServer, SYSNR=00, GROUP=PUBLIC, USE_SAPGUI=0, LCHECK=0"];

IFDATABASE: DataBase Name of the connected SAP Server

R3NAME: SAP Server System ID

CLIENT: Client Number that is being connected.

ASHOST: Application Server HOSTNAME or ip address

MSHOST: Message Server or Load Balancing Server HOSTNAME or ip address

GROUP: Server Group that is being direct to, in Load Balancing scenario.

LCHECK: License Check

USE_SAPGUI: To use or not use SAPgui connection details for RFC

11
Purpose: Liquid UI Debugger Activation and Execution to Debug Liquid UI Scripts, during Run-time.

Activation:
The below command needs to be added in GuiXT.sjs configuration file to activate Liquid UI Debugger.

                         debug = 1;

Execution:
        Pre-Requisite:
        * SAPgui has an active session.
        * "Activate GuiXT" is checked in "Customize Local Layout" Menu.

Option 1: From windows file explorer
Navigate to Liquid UI Debugger executable (WSDebugger.exe), and right-click, select "Run as administrator".
Liquid UI Debugger windows opens up and need to click on Lightning symbol to start debugging Liquid UI Scripts.

Option 2: From SAPGui session
Type /ws_h() in transaction entry field.
Liquid UI Debugger windows opens up and starts debugging Liquid UI Scripts.

12
Purpose: To activate Liquid UI License Management Portal account Validated and Activated.

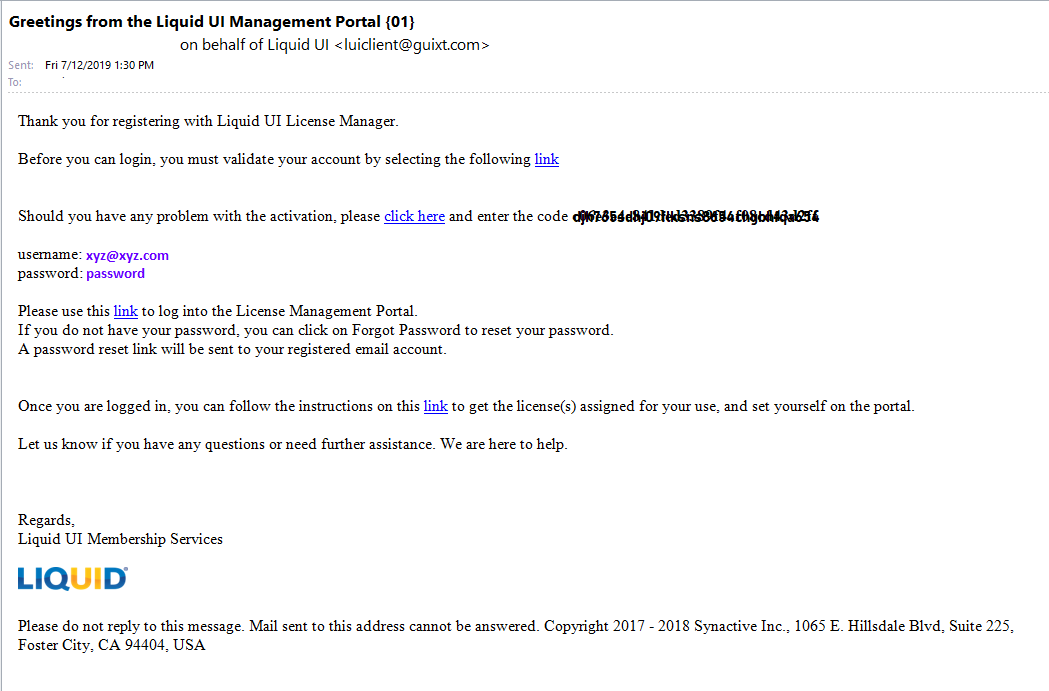
Once the License Management Portal Account is created, an auto-generated email is sent out to the associated administrator email addresses.
Example:


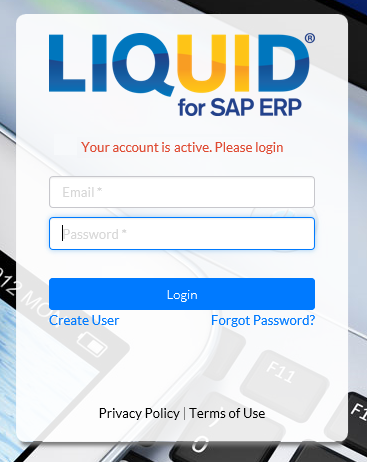
Follow the instructions provided in the email to activate Liquid UI LMP Account and then Log-in to LMP using the provided credentials.


Note: This Activation link is only valid for 7days, and failure to Activate Liquid UI LMP account, requires to re-send the activation link to that designated email address.


To re-send the activation link, please follow the below instructions,

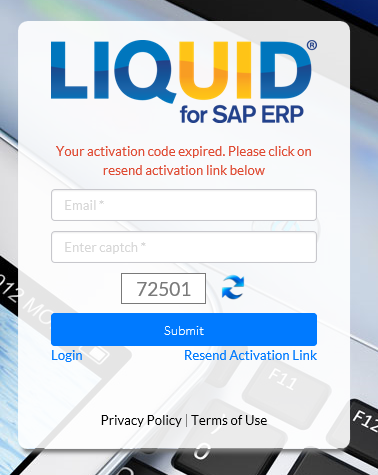
Step 01: Click on the Expired Activation link, in the received email.
Step 02: The browser is navigated to "Your activation code expired, click on resend activation link below" page.
Step 03: Populate Email with the email address, provided in the older email, with the activation link.
Step 04: Populate the "Enter Captch" with the respective Captch.
Step 05: Then click on "Resend Activation Link".

Another auto-generated email will be sent to the associated email address, with the new activation link, which again is valid for the next 7 days.
Follow the instructions provided in the email to activate Liquid UI LMP Account


13
Purpose: To generate Liquid UI LicenseManagementPortal License and installation of that generated license on a Liquid UI Client (Android and iOS) device.

Liquid UI Enterprise Portal License Generation:
After logging into the License Management Portal, you can follow Add User(s) link,
which contains the instructions (steps 1 - 4) to get the license(s) assigned to the user for installation on the Liquid UI Client devices.

Liquid UI Enterprise Portal License Installation:
After Step 4, in the above specified link, the user can follow the instructions specified in the License installation documentation, for Liquid UI Client, based on the below,
Liquid UI for Android
Liquid UI for iOS

Note: You can use one added USER(S)' email (generated email, with LMPLicense), to apply Liquid UI License(s) on multiple Liquid UI Client devices.

14
Purpose: To resolve issue concerning Liquid UI Designer Display resolution.

Issue Screen:


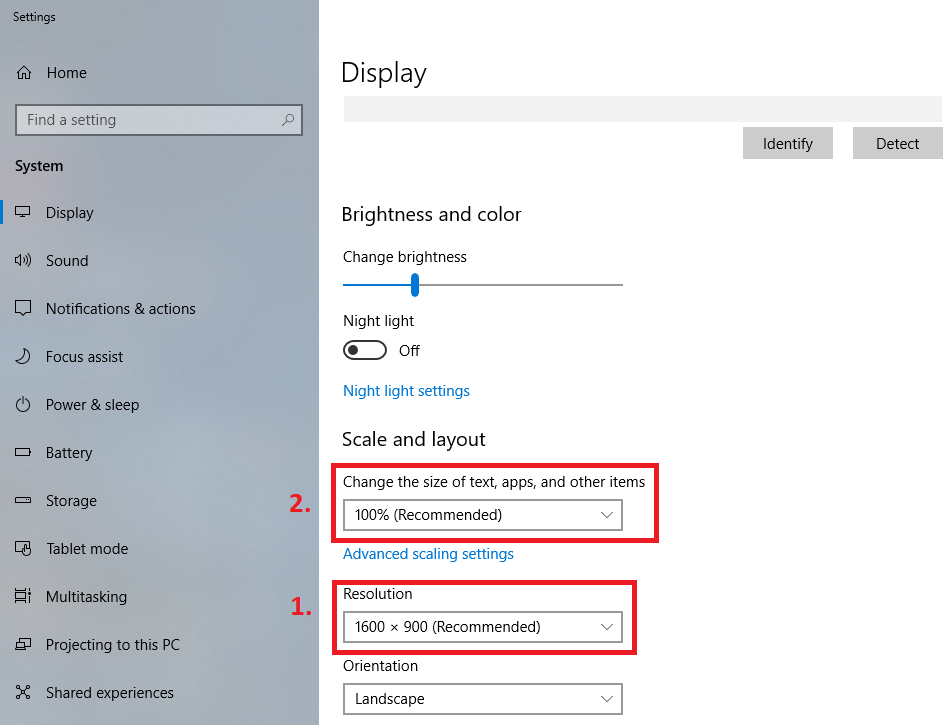
Investigation: As an initial step of the investigation, verify Scale and Layout of your Windows PC
1. Resolution.
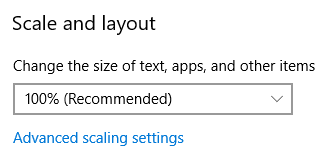
2. Size of Text, Apps and other items.


Resolution: Change the value to be 100% for Size of Text, Apps, and other items.


15
var dialog = new ActiveXObject('MsComDlg.CommonDialog');
dialog.Flags=0x200|0x80000|0x800|0x4|0x200000

File Open/Save Dialog Box Flags:

Constant                                      Value                                            Description
cdlOFNReadOnly                             0x1                           Checks Read-Only check box for Open and Save As dialog boxes.
cdlOFNOverwritePrompt                 0x2                           Causes the Save As dialog box to generate a message box if the selected file already exists.
cdlOFNHideReadOnly                      0x4                           Hides the Read-Only check box.
cdlOFNNoChangeDir                       0x8                           Sets the current directory to what it was when the dialog box was invoked.
cdlOFNHelpButton                          0x10                         Causes the dialog box to display the Help button.
cdlOFNNoValidate                           0x100                       Allows invalid characters in the returned filename.
cdlOFNAllowMultiselect                   0x200                       Allows the File Name list box to have multiple selections.
cdlOFNExtensionDifferent               0x400                       The extension of the returned filename is different from the extension set by the DefaultExt property.
cdlOFNPathMustExist                      0x800                       User can enter only valid path names.
cdlOFNFileMustExist                        0x1000                     User can enter only names of existing files.
cdlOFNCreatePrompt                      0x2000                     Sets the dialog box to ask if the user wants to create a file that doesn't currently exist.
cdlOFNShareAware                         0x4000                     Sharing violation errors will be ignored.
cdlOFNNoReadOnlyReturn              0x8000                     The returned file doesn't have the Read-Only attribute set and won't be in a write-protected directory.
cdlOFNExplorer                               0x0008000               Use the Explorer-like Open A File dialog box template.  (Windows 95 only.)
cdlOFNNoDereferenceLinks            0x00100000              Do not dereference shortcuts (shell links) default, choosing a shortcut causes it to be dereferenced by the shell.  (Windows 95 only.)
cdlOFNLongNames                         0x00200000              Use Long filenames.  (Windows 95 only.)


Different Show Methods available for Common Dialog:
dialog.ShowOpen();     // Common Dialog Open Box
dialog.ShowSave();      // Common Dialog Save As window
dialog.ShowFont();       // Common Dialog Font window
dialog.ShowPrinter();    // Common Dialog Printer window
dialog.ShowColor();      // Common Dialog Color window
dialog.ShowHelp();       // Common Dialog Help window

Pages: [1] 2 3 ... 6