Purpose
This guide aims to provide a practical demonstration of Liquid UI Offline, showcasing its potential to deliver uninterrupted SAP operations in disconnected environments. This demo illustrates how users can effectively perform critical tasks—such as accessing, modifying, and synchronizing SAP data—even when network connectivity is unavailable. By walking through the Liquid UI Offline experience, users gain insight into how the solution facilitates smooth data synchronization upon reconnection, ensuring data consistency.
Through this hands-on demo, users will discover the benefits of Liquid UI Offline in real-world scenarios, such as remote fieldwork or areas with limited internet access. The demo highlights how Liquid UI Offline simplifies Material Management tasks and demonstrates its capacity to enhance productivity, minimize downtime, and expand the reach of SAP functionality across diverse environments. This approach ensures that users appreciate the practical advantages and the operational resilience gained by integrating Liquid UI Offline into their SAP workflows.
System Setup
Installing Liquid UI Offline
- Download and Install Liquid UI Offline: Follow the installation steps in the guide.
- Directory: Create a directory, i.e., C:\Offline.
- Locating the files: Copy the necessary files, such as SynR3App.exe, webscript.dll, Configuration, and license files.
- Installing License: Ensure license files are correctly placed in the installation directory to activate Liquid UI Offline capabilities.

- SAP Connection Setup: To install and configure SAP GUI for offline functionality. This process includes setting up a local Offline server for synchronizing scripts.
- Set up the local Offline server, defining localhost (GuiXT_Offline) as the IP and 01 as the server number for offline synchronization.
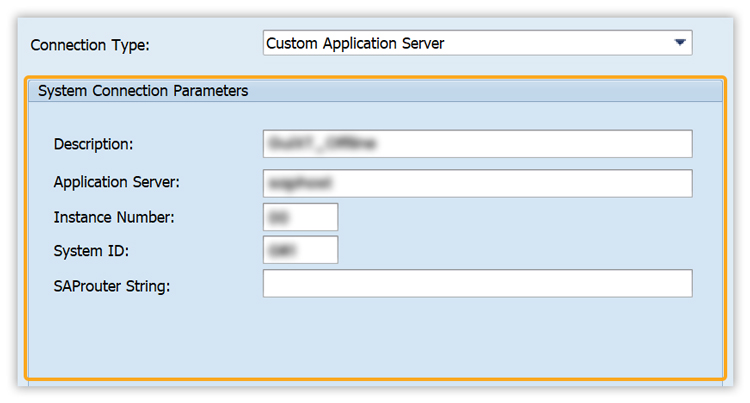
- Set up the local Offline server, defining localhost (GuiXT_Offline) as the IP and 01 as the server number for offline synchronization.
- Point to the location where the necessary scripts reside (C:\Offline\Scripts\Synscript).
Executing the Offline Demo
- Run the Liquid UI Server: The first step in the demo is to start the Liquid UI Server that establishes the communication link between the SAP GUI and the Liquid UI Offline client. This server activation enables SAP operations to be processed locally, supporting offline functionality and ensuring smooth data handling and synchronization once reconnected. To demonstrate this, we’ll walk you through the following:
- Navigate to Liquid UI Directory: Access the Liquid UI Server directory (typically located at C:\Program Files\Liquid UI\Liquid UI Server).
- Start the server: Run ´ConsoleMode.bat´ to activate the server.
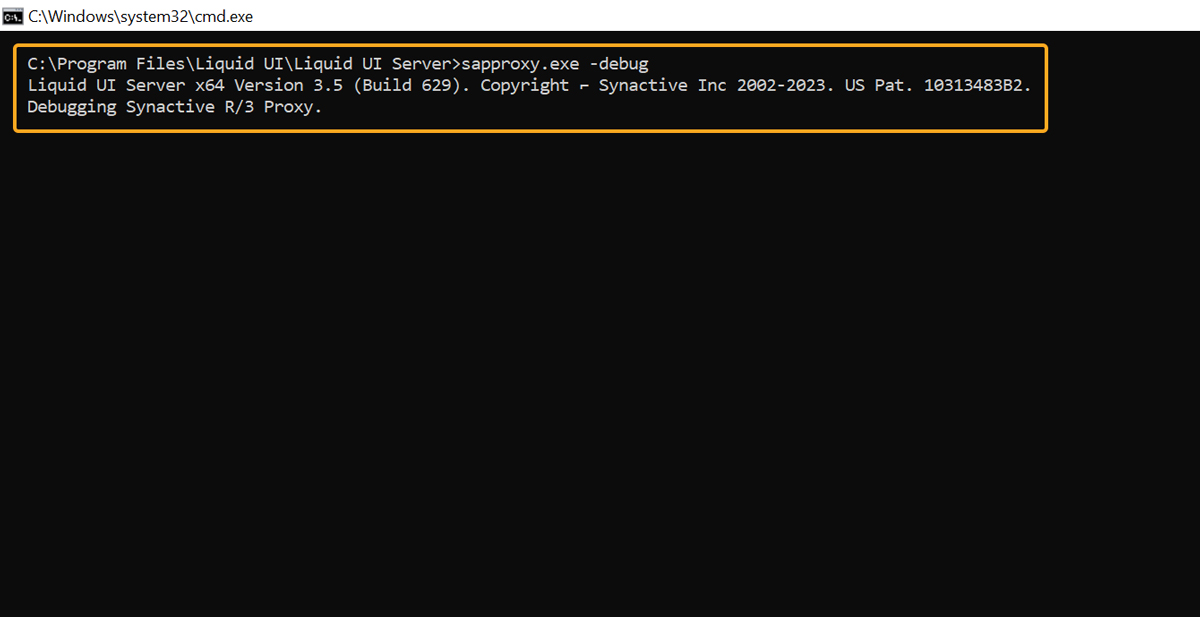
- Once the server starts, verify it is running successfully by checking the status messages. The server should be in a Ready state, indicating that C:\Program Files\Liquid UI\Liquid UI Server>sapproxy.exe -debug Liquid UI Server x64 Version 3.5 (Build 629). Copyright ⌐ Synactive Inc 2002-2023. US Pat. 10313483B2. Debugging Synactive R/3 Proxy.
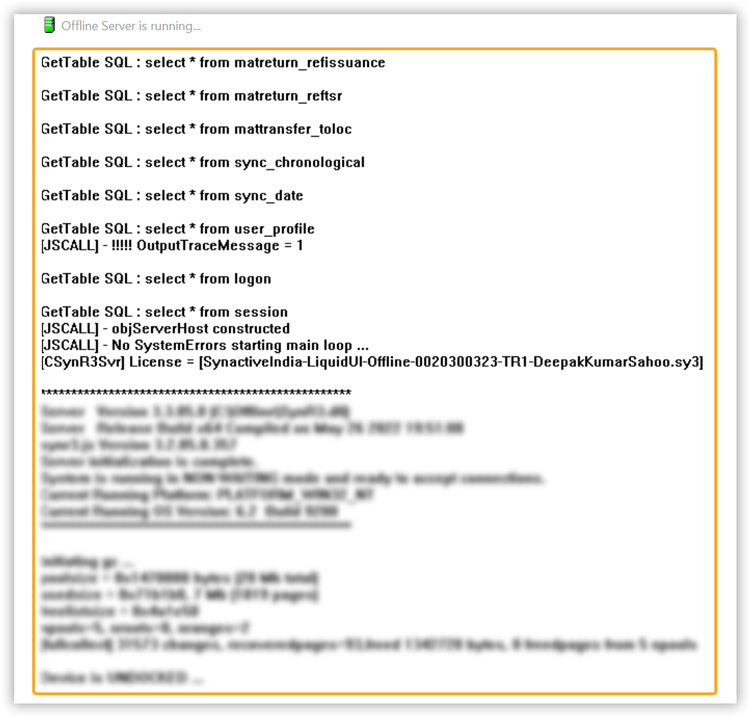
- Initiating the Offline Server: Once the Liquid UI Server is up and running, the next step is to start the Liquid UI Offline Server. This server allows the SAP client to operate in offline mode, handling data locally until synchronization with the SAP system is possible.
- Run RunOffline-DebugMode.bat in the Liquid UI Offline Server folder (C:\Offline).
- Monitor indicators like DEVICE IS DOCKED or Offline Server started to confirm server readiness.
- Running SAP in Offline Mode: After launching the Liquid UI and Offline servers, you can start SAP in offline mode. This enables you to log in and perform transactions without needing a connection to the main SAP system. Enjoy the convenience of offline access
- Launch the SAP Logon Pad and select the offline connection.
- Set server IP to 127.0.0.1 and provide credentials.
- Logon to offline to make transactions, and your account will sync once you're connected to the internet.

- Accessing the Offline Menu Screen: Upon logging into SAP, users encounter the OFFLINE MENU screen, which presents three primary options for offline tasks:
- Offline Menu Screen: Upon successful login, the screen appears, presenting a user-friendly interface with three simplified pushbuttons options tailored for offline operations.
- Synchronization: Sync data with the SAP server when regaining connectivity.
- Stock Update: Modify inventory quantities with the Stock Update button. Adjustments are stored locally and synced with SAP on the next connection, ensuring accurate inventory levels offline.
- F1Logoff: Safely log out of offline sessions to ensure security.
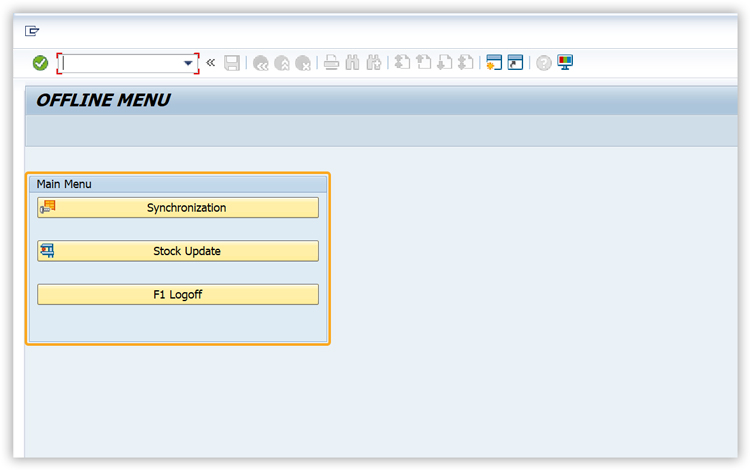
- Offline Menu Screen: Upon successful login, the screen appears, presenting a user-friendly interface with three simplified pushbuttons options tailored for offline operations.
- Using the Synchronization Screen: Within the context of data management, the synchronization screen holds a pivotal position. When the user selects the Synchronization pushbutton from the Offline Menu, they are directed to the Synchronization: Offline screen. This screen serves as a crucial component for overseeing and managing the synchronization process between offline data and the SAP system.
Synchronization: Offline Screen:
- Plant Value: The screen displays the current plant value, set to 2000, indicating the specific plant for synchronization.
- Date and Time Fields:
- From SAP (Last synchronization date with SAP system): This field displays the date and time for the last synchronization performed with the SAP system. It indicates when the offline database was last updated with data from SAP.
- To SAP (Set date and time to upload offline data to SAP): This field is where users can set the date and time for uploading offline data back to the SAP system.
Pushbuttons
- Synchronize FROM SAP updates offline data.
- Synchronize TO SAP ensures consistency with the main system.
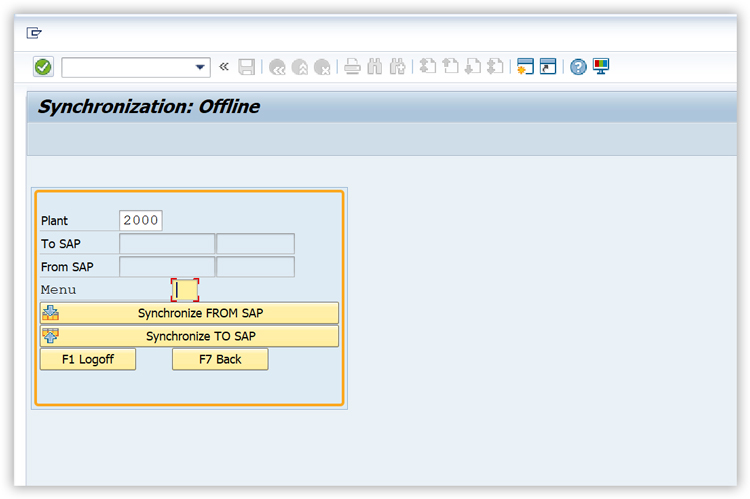
- Synchronization from SAP: In this step, the user will click the Synchronize FROM SAP button to pull the latest data from the SAP system into the offline database.
Executing the Synchronization:
- Initiate Synchronization from SAP System:
- On the Synchronization: Offline interface, identify the Synchronization from SAP button.
- Activate the button to commence the procedure of acquiring the most up-to-date data from the SAP system.
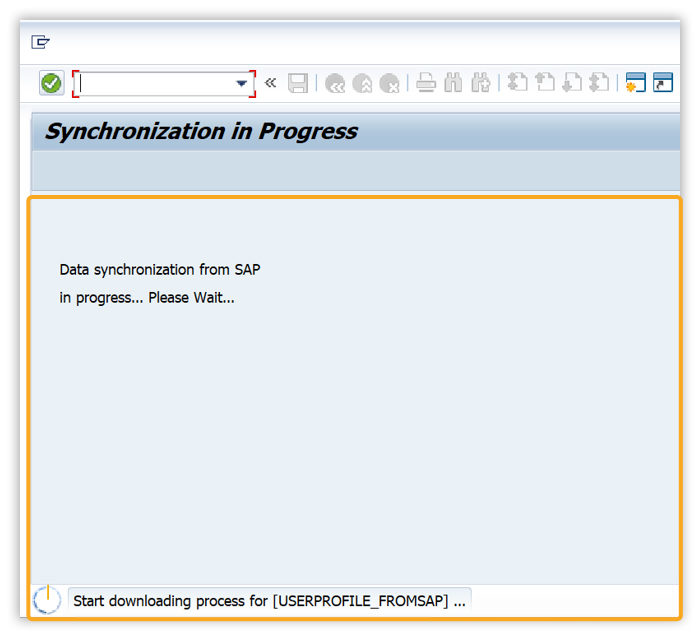
- Monitor the Synchronization Process:
A progress indicator will be displayed, accompanied by the following message: Data Synchronization from SAP in progress... Please wait... This message indicates that the system is actively pulling data from SAP.
- Success Message:
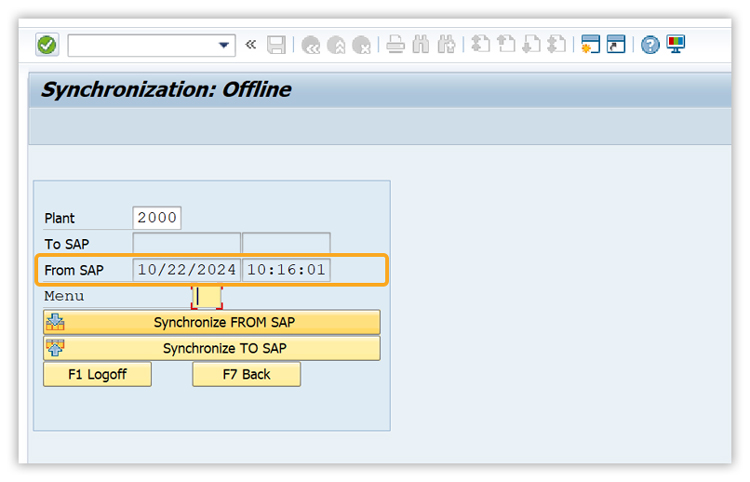
Synchronization confirmation message Synchronization completed indicates offline database update with the latest SAP information. The From SAP field updates with the latest synchronization date and time.
- Stock Update
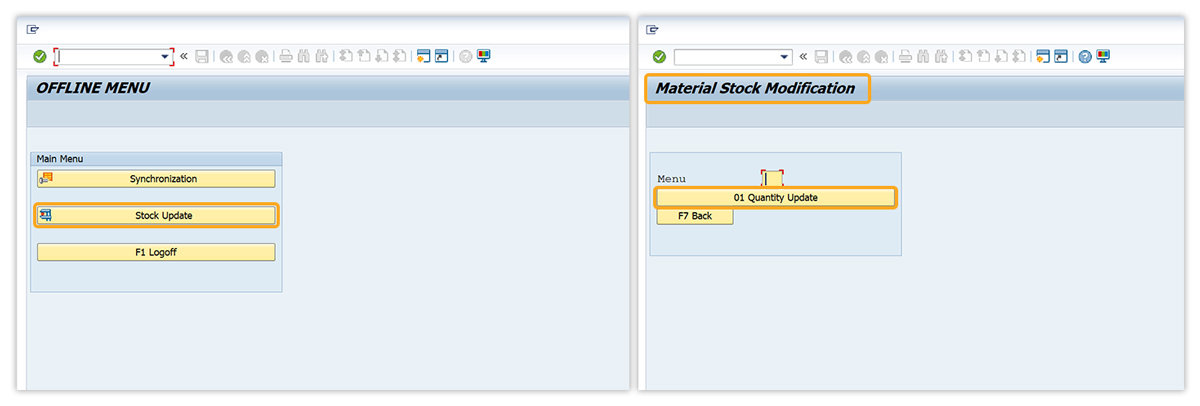
Upon the successful completion of the synchronization process, the user is presented with the option to click on the Stock Update pushbutton. This action enables the user to make modifications to the quantity of unrestricted stock levels while operating in an offline mode.
Executing the Stock Update:
- From the OFFLINE MENU, select Stock Update. The Material Stock Modification screen appears, allowing users to adjust stock quantities.
- Locate the 01 Quantity Update button on the Material Stock Modification screen.
- Clicking this button opens the Unrestricted Quantity Adjustment screen for specific stock quantity changes.
- Unrestricted Quantity Adjustment
After navigating to the Unrestricted Quantity Adjustment screen from the Material Stock Modification screen, the user can update stock levels by specifying the material and quantity to be adjusted.
Executing the Unrestricted Quantity Adjustment:
- Enter material number, the material number of the stock item requiring modification.
- Enter Quantity adjustment, the adjustment value in the Quantity Adjustment field.
- Post the adjustment, click Post to confirm changes, and update the stock in the offline database.
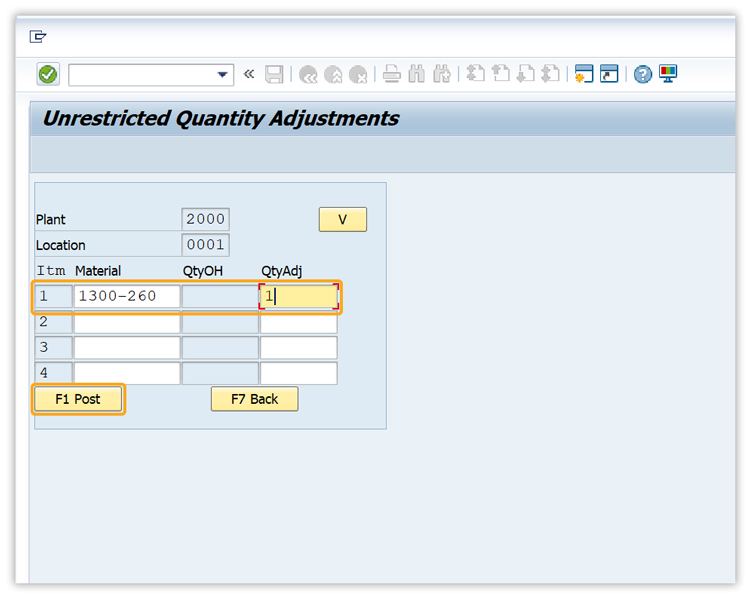
- Synchronization to SAP: Following the modification of inventory levels, the subsequent step entails synchronizing the updated information with the SAP system. This process guarantees that the adjustments made to quantities offline are accurately reflected within the primary SAP system.
Executing the Synchronization to SAP:
- Click Synchronize TO SAP to upload modified data from the offline system to the SAP server.
- Monitor the progress indicator or status message as Data Synchronization from SAP in progress... Please wait... to confirm data is being uploaded.
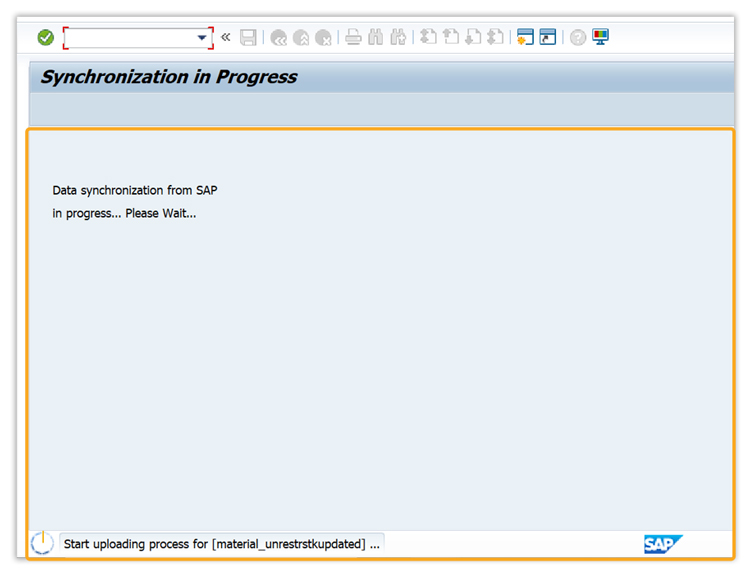
- Upon the successful completion of the synchronization process, a message will be displayed: Synchronization to SAP completed. This serves as verification that all alterations made offline, encompassing adjustments to stock quantities, have been effectively uploaded into the SAP system.
- The To SAP field will also update to reflect the date and time of the synchronization.
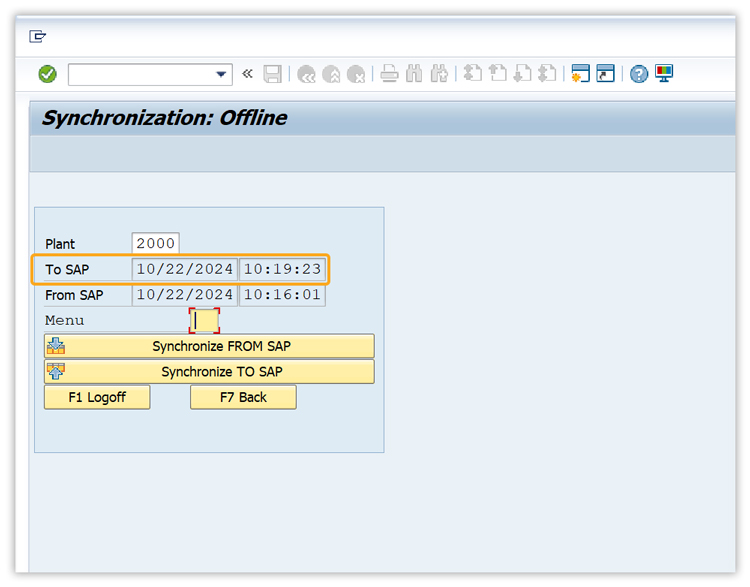
- Verifying Data Update in the Offline Database: After completing the stock quantity adjustment and synchronizing the data with the SAP system, you can verify that the changes were successfully applied by re-synchronizing and reviewing the updated data in the offline database.
Executing Synchronization from SAP:
- Initiate Synchronization from SAP:
- Navigate back to the Synchronization: Offline screen and select the Synchronize FROM SAP button.
- This action will retrieve the most recent data from the SAP server, including any inventory updates that were previously synchronized to SAP.
- Progress Indicator:
- A progress message will be displayed as Data Synchronization from SAP in progress... Please wait....
- Upon completion of the synchronization process, a confirmation message will appear: Synchronization from SAP completed.
Checking the Updated Data in the Database:
- Access the Database:
- Navigate to the local offline database file (e.g., stored in the SQLite format) utilized by the Liquid UI Offline system.
- Open the database using an appropriate database browser tool (such as DB Browser for SQLite) to review the stored data.
- Review Unrestricted Stock Values:
- Within the DB Browser, locate the pertinent table or data set where material stock levels are stored.
- It is imperative to ascertain that the unrestricted stock values accurately reflect the adjustments made during the offline session. Specifically, the quantity associated with the modified material should be updated to display the revised value.

The Liquid UI Offline solution revolutionizes SAP functionality, facilitating seamless workflows regardless of connectivity. Through meticulously defined procedures for offline data management, this demonstration serves as a testament to the efficacy of Liquid UI Offline in preserving the integrity of SAP data and elevating operational dependability in remote and network-constrained environments.
Adjusting Inventory Data in Liquid UI Offline: A Practical Scenario
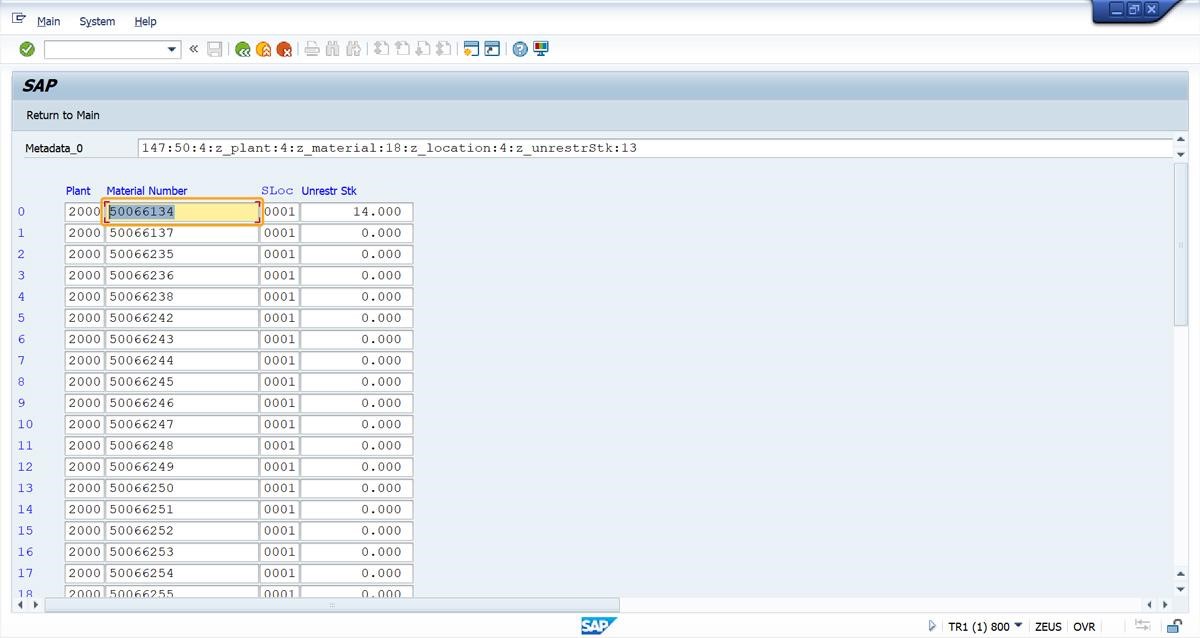
Log into SAP: Start by logging into your SAP system. Navigate to the appropriate process and input the value for Records per Page to display records. Here, we’ve selected MATERIAL_STK_FROMSAP
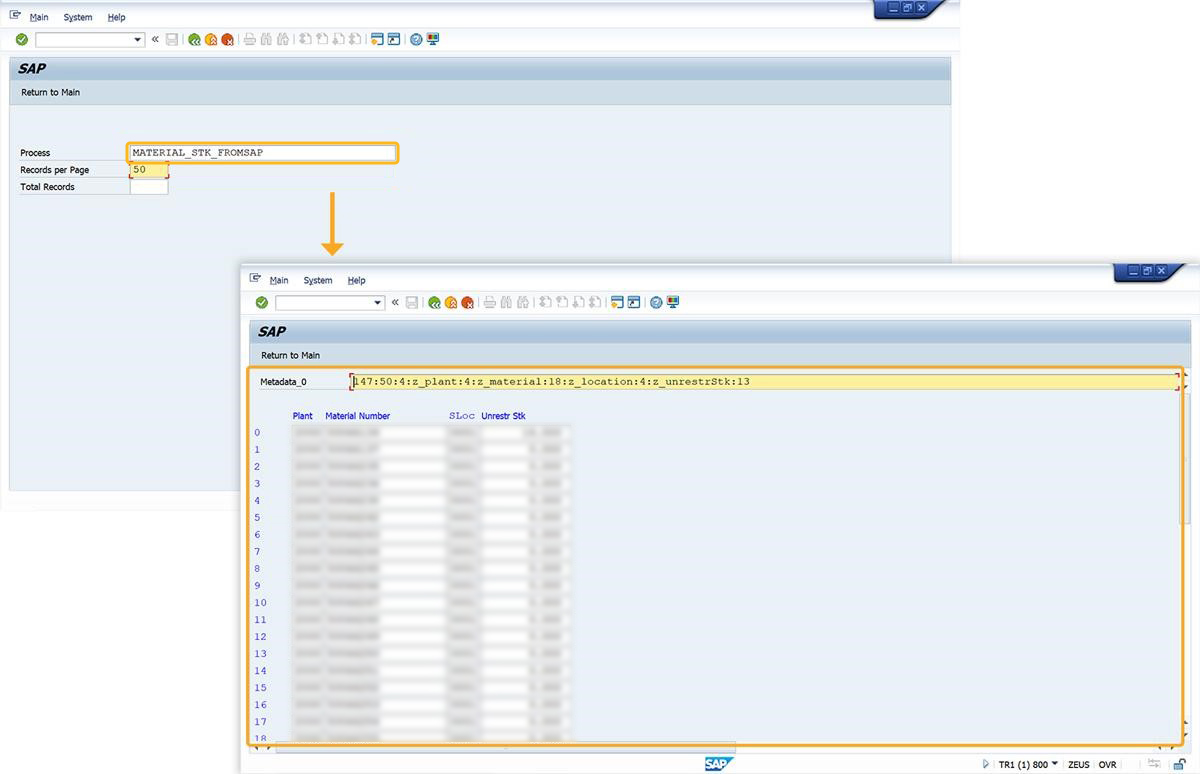
For this example, we will adjust the stock quantity for material 50066134. Copy the Material Number.
Adjusting the material quantity:
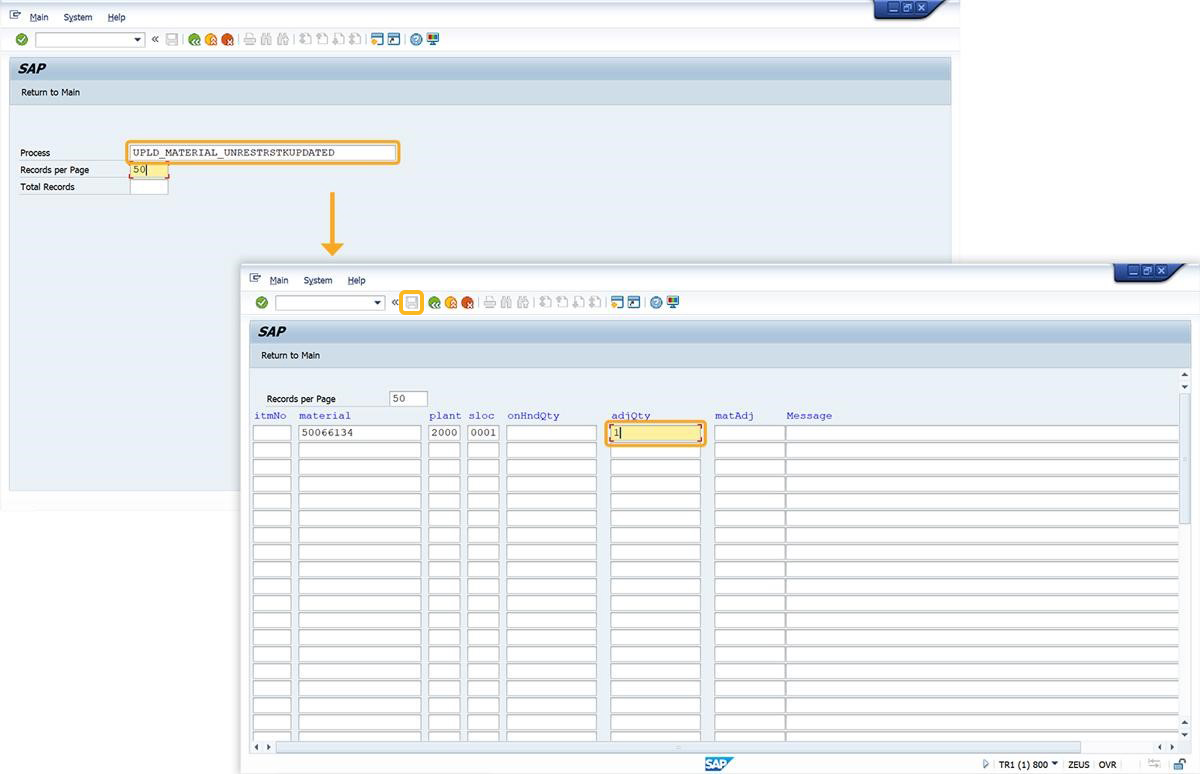
Return to the main screen and select the process
UPLD_MATERIAL_UNRESTRSTKUPDATED.
On the screen that appears, enter the adjustment quantity for the material and click Save.
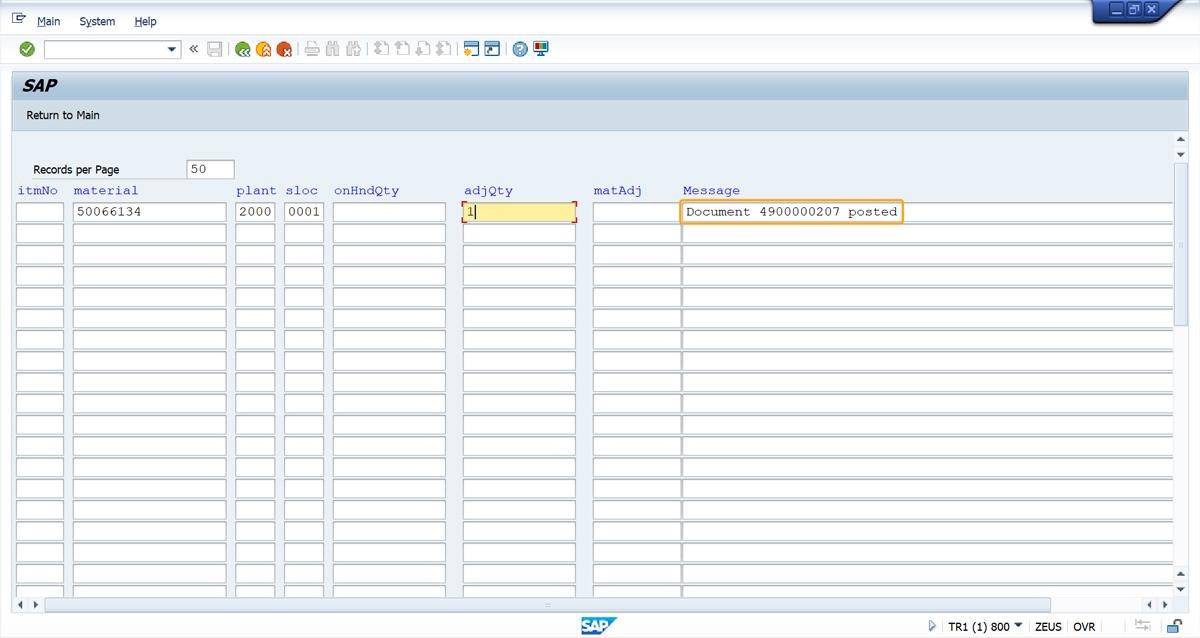
Upon saving, a success message will appear: Document 4900000207 posted, confirming that the update was successful.
Verifying the adjusted quantity:
Return to the main screen and select the process MATERIAL_STK_FROMSAP to ensure the adjustment was applied correctly.
After entering this process, you will see the updated stock quantity displayed in the table.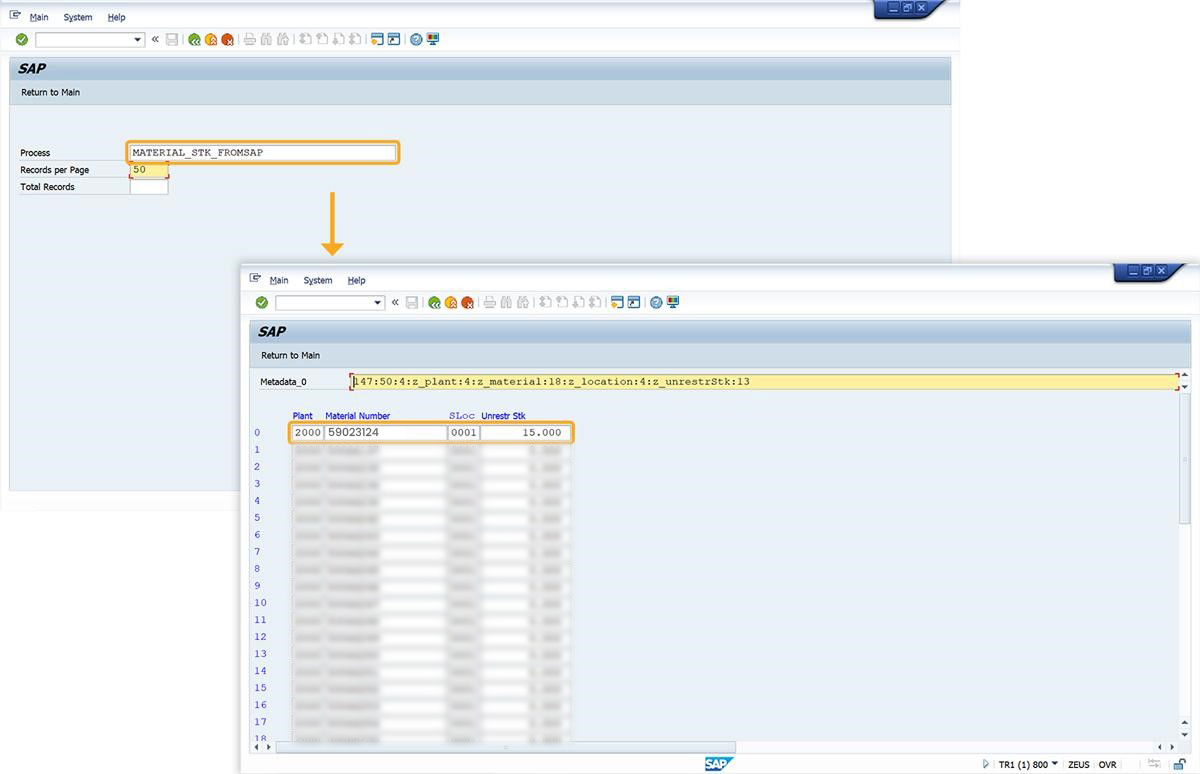
This example demonstrates how easily users can adjust and verify inventory data using Liquid UI Offline, ensuring accurate and efficient material management even in disconnected environments.
- Initiate Synchronization from SAP:


