Prerequisites
- Products: Liquid UI WS, Liquid UI Server or Local DLL, Client Software
- Commands: set(), table(), column()
Purpose
Learn how to display Sales Order details in a Liquid UI table by creating a class that develops a modular script to access data pertaining to a single item. We will walk you through the following steps.
- Add function to create a class
- Add a pushbutton and Liquid UI table
- Add a function to fetch Item details
- Display the Item details on the same screen
User Interface
//Create this file inside your script folder for customizing the Display Sales Order Initial screen SAPMV45A.E0102.sjs
//Now, let's add the Liquid UI script to the above file and save it.
- Add a function with the name Item to create a class for Item details.
// This function creates a class for Item
function Item(itm,mat,qty,su){
    // Attributes of the class
    this.item = itm;
    this.material = mat;
    this.quantity = qty;
    this.sales_unit = su;
    // Function used to retrieve information on Item
    this.getInfo = function(){
        return "Item:"+this.item+", Material:"+this.material+", Quantity:"+this.quantity+", Sales Unit:"+this.sales_unit;
    }

}
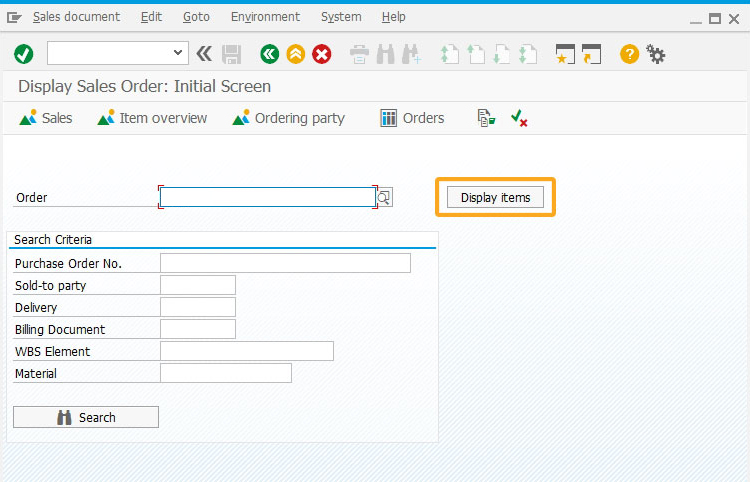
- Add a pushbutton labeled Display items to execute the process fetchItems on click, as shown in the image below.
// Only execute the following for VA03
if(_transaction == "VA03"){
    // Pushbutton that will trigger the funciton
    pushbutton("F[Order]+[0,62]", "Display items", "?", {"process":fetchItems});

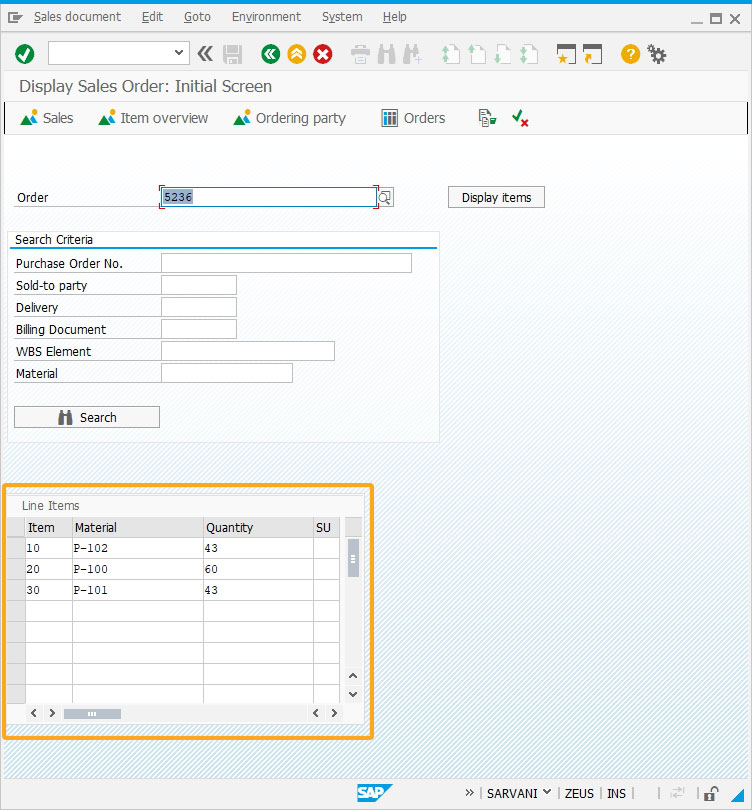
- Now, add the Liquid UI table to display only on the Display Sales Order screen.
  // If item_array is undefined, initialize it.
        item_array = [];
    }

    // If the array has data in it
    if(item_array.length>0){
        // Create a table and columns
        table([16,0], [26,50], {"name":"z_table", "title":"Line Items", "rows":item_array.length});
        column("Item", {"size":6,"name":"z_item", "table":"z_table"});
        column("Material", {"size":18,"name":"z_mat", "table":"z_table"});
        column("Quantity", {"size":15,"name":"z_qty", "table":"z_table"});
        column("SU", {"size":3,"name":"z_su", "table":"z_table"});

        // Fill out the table
        for(i=0;i<item_array.length;i++){
            println(item_array[i].getInfo());
            z_table.z_item[i] = item_array[i].item;
            z_table.z_mat[i] = item_array[i].material;
            z_table.z_qty[i] = item_array[i].quantity;
            z_table.z_su[i] = item_array[i].sales_unit;
        }

    }
}
This function will table scroll through the VA03 transaction and fetch the data from the table function fetchItems()
{ onscreen 'SAPMV45A.0102' enter(); onerror message(_message); enter("?"); goto FUNC_END;
 onscreen 'SAPMV45A.4001'
// Clear the value of item_array item_array = []; absrow = 1; enter("/ScrollToLine=&V[absrow]", {"table":"T[All items]"});
NEW_SCREEN:; onscreen 'SAPMV45A.4001' gettableattribute("T[All items]", {"firstvisiblerow":"FVR", "lastvisiblerow":"LVR", "lastrow":"LR"}); relrow = 1; NEW_ROW:; println("absrow:"+absrow+", LVR:"+LVR+", LR:"+LR); // end of table?
 if(absrow>LR){ goto END_OF_TABLE; } // end of screen?
if(absrow>LVR) { goto NEW_SCREEN; } set("V[z_temp_item]", "&cell[All items,Item,&V[relrow]]");
 set("V[z_temp_mat]", "&cell[All items,Material,&V[relrow]]"); set("V[z_temp_qty]", "&cell[All items,Order Quantity,&V[relrow]]");
 set("V[z_temp_su]", "&cell[All items,SU,&V[relrow]]");
  // Push a new Item to the array item_array.push(new Item(z_temp_item,z_temp_mat,z_temp_qty,z_temp_su)); absrow++; relrow++; goto NEW_ROW; END_OF_TABLE:;
enter('/ScrollToLine=1', {"table":"T[All items]"});
 onscreen 'SAPMV45A.4001' enter("/3") FUNC_END:;
 }
SAP Process
- Logon to SAP and navigate to VA03 (Display Sales Order: Initial Screen). Then, enter the Order number and click Display items.

- Now, you can see the Line Items table with the Item details displayed on the same screen, as shown below.

Next Steps

Liquid UI: Creating a Process for IW21
Learn how to create a notification with a single click.
Learn how to create a notification with a single click.
10 min.
This article is part of the Screens combination/aggregation tutorial.


