Purpose
With table(), you can create a new, or modify an existing table and its content on an SAP screen. You can add columns, populate data, or display data from a table using column(). Additionally, you can easily perform other operations on the table's columns.

Note: You can specify the table's position in different ways. Learn more about positioning the screen elements.
Syntax
With the following formats, you can easily create a table with any desired number of rows and columns, including all the required functionality.
Format 1:
Creates a table by specifying its name, title, and the desired number of rows and columns.
table([startrow,startcol],[endrow,endcol],{"name":"table name","title":"table title","rows":number});

Note: When creating a new table, it will become visible only after columns have been added.
To add a column, use the following command:
column("heading",{"size":x,"name":"column_name","option":value…});
Refer column() command section for more details.
Format 2:
Creates a table with reference to the screen elements.
table("F[screen element]+[startrow,startcol]",[endrow,endcol],{"name":"table name","title":"table title","rows":number});
Liquid UI provides two categories of commands to manage tables:
- Options to manage Rows and Columns
Properties
- startrow, startcol, endrow, endcol - row and column coordinates
- screen element - field name.
Parameters
The table command takes the following parameters for a Liquid UI table:
- name - Defines the name of a Liquid UI table control
- title - Defines the on-screen label of a Liquid UI table control
- rows - Defines the number of rows in a Liquid UI table control
Available Options
You can use the following options with the table command:
|
"columnselection":true - This option allows the user to choose one or more columns from a table for selection. |
|
|
"fixedcolumns":X - The 'X' number of columns remains fixed while scrolling horizontally. |
|
|
"rowselection":true - This option allows the user to choose one or more rows from a table for selection. |
|
|
"singlecolumnselection":true - Selects a specific column from the table. |
|
|
"singlerowselection":true - Selects a specific row from the table. |
Options Detail
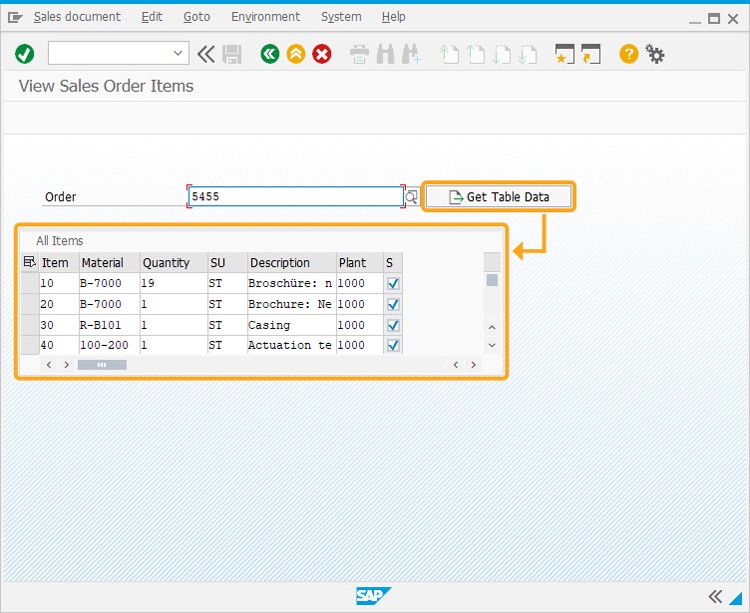
The following options are demonstrated using the existing table in the SAP screen.
<>
Other system variables can be associated with SAP tables in addition to those listed above. The capabilities include:
Populating and displaying table data
|
Data Population |
|
|
Data Display |
|

Note: You can use the table name and column name instead of the table title and labels to reference a column.
Displaying table data using System Variables
The ´table()´ function supports various system variables that allow you to display data from any cell within the table. You can use either of the following syntax options:
V[cursortabname.cell.column_name.row_number]
V[cursortabname.cell.column_number.row_number]
The available system variables are as follows:
- _tabrow
-
Displays the count of rows in a table.
println("The number of rows is >> " +_tabrow); - _tabcol
-
Displays the count of columns in a table.
println("The table columns are >> " +_tabcol); - _cursortabname
-
Displays the title of a table, which is shown on the screen; Liquid UI scripts use the technical name.
The table title is visible on the screen, while Liquid UI scripts employ the technical name.
println("Table title is: " + _cursortabname); - _cursortabtechname
-
Displays the technical name of a table, used by Liquid UI scripts.
The technical name used by Liquid UI scripts appears while the table title appears on the screen.
println("Table name is:" +_cursortabtechname); - _cursorcolname
-
Displays the heading of the current table column, visible on the screen; Liquid UI scripts use the technical name.
Column heading appears on the screen while column name (technical name) is used by Liquid UI scripts.
println("Column title is:" +_cursorcolname); - _cursorcoltechname
-
Displays the technical name of a column in a table, used by Liquid UI scripts.
Column technical name is used by Liquid UI scripts while the column heading appears on the screen.
println("Column title is:" +_cursorcoltechname); - _tabrowabs
-
Displays the absolute row number of the cursor's position in a Liquid UI table, even during scrolling.
println("Absolute cursor row is:" +_tabrowabs); - _cursorrow
-
Displays the first row of a table.
println("Row where table begins: " +_cursorrow); - _cursorcol
-
Displays the absolute column number of the cursor in a Liquid UI table, accounting for scrolling.
println("Column where table begins:" +_cursorcol);
Example 1: Displaying sales order items table in va02: dynamic selection and custom row limits.
This example provides a simplified view of sales order items, illustrating how to effectively display required data in the change sales order initial screen from the all items table.
Script
// Creates table labeled Sales Order Items
table([8,2],[10,95],{"name":"va02_all_items","title":"Sales Order Items","rows":row_max,"rowselection":true,"columnselection":true});

Example 2: Selection of rows and columns at run time
Purpose
Using the table(), you can easily pre-select rows and columns in a Liquid UI table by utilizing the selectedrows and selectedcols parameters.
Syntax
You can select a specific row in a table using the following syntax.
table_name.selectedrows[row_index] = “X”;
You can select a specific column in a table using the following syntax.
table_name.selectedcols[col_index] = “X”;
- table_name - Represents the name of the Liquid UI table.
- row_index - Represents the row number you want to select.
- col_index - Represents the column number you want to select.
User Interface
To pre-select rows and columns in the Liquid UI table, follow the steps.
- Navigate to the SAP Easy Access screen and delete the image container on the screen.
// Deletes image container on the SAP Easy Access Screen
del("X[IMAGE_CONTAINER]");
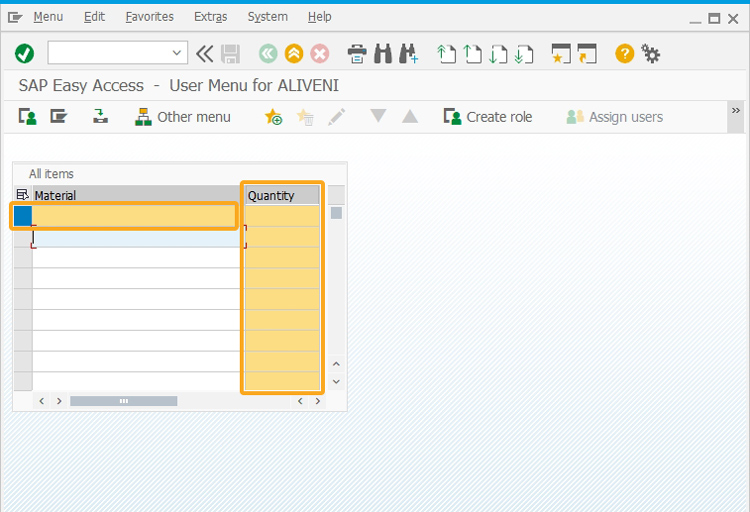
- Create a table labeled All items with 10 rows and 2 columns labeled Material and Quantity.
// Creates table labeled All items
table([1,1], [12,48],{"name":"proj", "title":"All items", "rows":10,"rowselection":true,"columnselection":true});
column('Material', {"table":"T[All items]", "size":30, "name":"matnr", "position":1, "table":"T[All items]"});
column('Quantity', {"table":"T[All items]", "size":10, "name":"qty", "position":2, "table":"T[All items]"});
- As per the code, the pre-selected row and column are shown below.
// For selecting a row of a table
proj.selectedrows[0] = "X";

// For selecting a column of a table.
proj.selectedcols[1] = "X";


Note: selectedrows and selectedcols are arrays and their index starts from ‘0’
Tips and Tricks
-
Arrays using Key/Value Pairs
Insert and display values from an array using Key/Value pairs.
table([1,1],[20,50],{"name":"matl_table","title":"Material Info","rows":20});
Learn more about Arrays implementation with tables.
-
Clear Liquid UI Table
Clear all or a few of the columns of a Liquid UI table.
table([1,1],[20,50],{"name":"matl_table","title":"Material Info","rows":20});
Learn more about Liquid UI Table.
-
Dynamic create table and read/write value into table cell
This example is to create the logic of displaying multiple Liquid UI tables on the screen and read or write values from the table.
table([start_row,10],[start_row+5,40],{"name":"z_table_"+i,"title":"Record"+i,"rows":50});
Learn more about Dynamic Table Data Handling.
-
Change the width of the SAP table
In this example, you can see how easy it is to change the width of a SAP table.
tablewidth([T[table_name]],50);Learn more about Table Width.


